Welcome to our NFT generation and deployment tutorial! In just two clicks, you can create and deploy your own valuable NFTs. Our tutorial will guide you through the process of generating and deploying unique NFTs quickly and easily.
This tutorial will guide you on how to set up your environment to create an AI-generated NFT collection. You will learn how to configure your .env file, run the backend and frontend servers, and ensure that you have enough faucet funds.
You will need
A Starton API KEY
A Wallet with currency of your network
A DALL-E 2 API KEY
What is DALL-E 2?
DALL-E 2 is an artificial intelligence (AI) model developed by OpenAI. DALL-E 2 is designed to generate images from textual descriptions.
It is capable of generating complex and detailed images. It can create images that are up to 1024x1024 pixels in size, and can generate multiple objects and textures within a single image. DALL-E 2 can also create images that are animated and can be interacted with.
The project has been set up using a client-side and a server-side so that your API key is not exposed on client. You can also use the server-side to connect a database for metrics.
Before you start setting up the project, you need to set the environment variables.
In the backend folder of the project, set up an .env according to .env.example:
API_HOST=localhost
API_PORT=8000

## Put on the following line your Starton API key (available at https://app.starton.com)
STARTON_API_URL='https://api.starton.io/v3'
STARTON_API_KEY=

## Put on the following line your Signer wallet address
STARTON_SIGNER_WALLET=

## Put on the following line your OpenAI API key (available at https://platform.openai.com/account/api-keys)
OPEN_AI_API_KEY=
In the frontend set up your .env file according to .env.example :
Here we would like to enter the data needed to generate and deploy your collection as well as entering your API, so that you can authenticate safely to the API.
Go to the backend folder of the project.
Run the command yarn install to install the required dependencies.
Enter the receiver wallet of the NFT (where you want to send the NFTs).
Select the network on which you want to deploy your NFTs.
If you are testing, then use the testnet network, and if you are ready to deploy, use the mainnet network (between Polygon, Avalanche, Binance, and Ethereum).
Choose the number of NFTs that you want to create for your collection.
Enter the prompt that will generate the images for your NFTs.
You can use different prompts to create unique and personalised NFTs.
Click Generate to display the assets for your NFTs.
Review the generated assets.
Once you are satisfied with the images, click Deploy.
Congratulations! You just deployed an NFT collection of images generated by AI.
To enter a name on the marketplace’s dashboard and perceive fees when someone sells one of our NFTs, we need to implement the contract-level metadata.
Here are the values we will use:
{ "name":"My Super NFT on Auction", "description":"You’ve never seen NFTs this beautiful.", "image":"", "external_link":"", "seller_fee_basis_points":100, "fee_recipient":"PUT YOUR ADDRESS HERE" }
We now have the content of our metadata, we need to upload it on IPFS.
To upload our files on IPFS we will now use the Starton IPFS pinning service.
As the contract-level metadata only needs to be uploaded once, we can directly do it from our dashboard.
Go to IPFS.
Click Upload.
Select JSON.
Enter JSON content.
Enter a name for the file.
Click Upload.
Once done, a column “CID” appears with a value for our file. We will use this data for the Contract Uri Suffix of our smart contract!
We also use IPFS to store the content that will be referenced in our deployed contract.
We do not store the content directly on blockchain as it is too heavy and would induce a very high cost.
The best solution is to store it somewhere else and only store a reference on-chain.
Go to IPFS.
Click Upload.
Select File(s).
Select content.
Enter a name for the file.
Click Upload.
Once our image uploaded, let's upload its metadata so that we can call it from our smart contract function.
For the sale contract to be able to mint new tokens, you are going to need to grant the newly created contract the MINTER_ROLE over the base contract deployed.
To enter a name on the marketplace’s dashboard and perceive fees when someone sells one of our NFTs, we need to implement the contract-level metadata.
Here are the values we will use:
{
  "name": "My Super NFT for Sale",
  "description": "You’ve never seen NFTs this beautiful.",
  "image": "",// the URI of your image, for example ipfs://CID_OF_YOUR_IMG
  "external_link": "",
  "seller_fee_basis_points": 100,
  "fee_recipient": "PUT YOUR ADDRESS HERE"
}
We now have the content of our metadata, we need to upload it on IPFS.
To upload our files on IPFS we will now use the Starton IPFS pinning service.
As the contract-level metadata only needs to be uploaded once, we can directly do it from our dashboard.
Go to IPFS.
Click Upload.
Select JSON.
Enter JSON content.
Enter a name for the file.
Click Upload.
Once done, a column “CID” appears with a value for our file. We will use this data for the Contract Uri Suffix of our smart contract!
We also use IPFS to store the content that will be referenced in our deployed contract.
We do not store the content directly on blockchain as it is too heavy and would induce a very high cost.
The best solution is to store it somewhere else and only store a reference on-chain.
Go to IPFS.
Click Upload.
Select File(s).
Select content.
Enter a name for the file.
Click Upload.
Once our image uploaded, let's upload its metadata so that we can call it from our smart contract function.
To enter a name on the marketplace’s dashboard and perceive fees when someone sells one of our NFTs, we need to implement the contract-level metadata.
Here are the values we will use:
{ "name":"My Super NFT on Auction", "description":"You’ve never seen NFTs this beautiful.", "image":"", "external_link":"", "seller_fee_basis_points":100, "fee_recipient":"PUT YOUR ADDRESS HERE" }
We now have the content of our metadata, we need to upload it on IPFS.
To upload our files on IPFS we will now use the Starton IPFS pinning service.
As the contract-level metadata only needs to be uploaded once, we can directly do it from our dashboard.
Go to IPFS.
Click Upload.
Select JSON.
Enter JSON content.
Enter a name for the file.
Click Upload.
Once done, a column “CID” appears with a value for our file. We will use this data for the Contract Uri Suffix of our smart contract!
We also use IPFS to store the content that will be referenced in our deployed contract.
We do not store the content directly on blockchain as it is too heavy and would induce a very high cost.
The best solution is to store it somewhere else and only store a reference on-chain.
Go to IPFS.
Click Upload.
Select File(s).
Select content.
Enter a name for the file.
Click Upload.
Once our image uploaded, let's upload its metadata so that we can call it from our smart contract function.
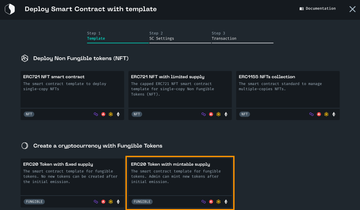
If you want to mint more than one edition of your NFT, you'll need to create a smart contract using an ERC1155-flavored template.
When minting an NFT collection, you make multiple identical editions of the content. This is one type of collection. Multiple digital items will be issued. They will feature identical content with a different, unique token ID for each NFT. In this case, you will have a unique token ID for each digital item issued with its unique data.
You will need:
a wallet to fund the creation of your contract
the URI of the metadata of your collectionRead more.
the URI of the content of the NFT. You can upload your file on IPFS. Read more.
This is where we use the values we've listed earlier:
Name: "My first NFT collection"
Description: "This is my first collection of NFT "
Definitive Name: "myFirstCollection"
Initial Token URI: the link to the content of your NFT
Initial Contract URI: the link to the metadata of your contract
Initial Owner of Multi Sig Contract: The address of the owner of the contract
const axios =require("axios") const axiosInstance = axios.create({ baseURL:"https://api.starton.com", headers:{"x-api-key":"PUT HERE YOUR API KEY"}, }) axiosInstance .post("/v3/smart-contract/from-template",{ network:"", signerWallet:"", templateId:"ERC1155_META_TRANSACTION", name:"My first NFT collection", description:"This is my first collection of NFT ", params:[ "myFirstCollection", "",// Initial Token URI "",// Initial Contract URI "",// Initial Owner of Multi Sig Contract ], speed:"average", }) .then((response)=>{ console.log(response.data) })
Id: the identifer of the NFT within the collection
Amount: amount to mint
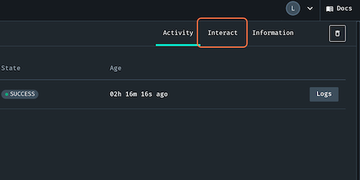
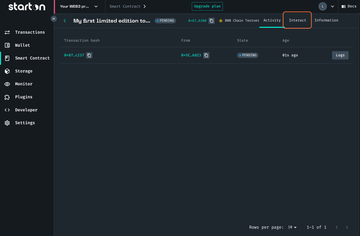
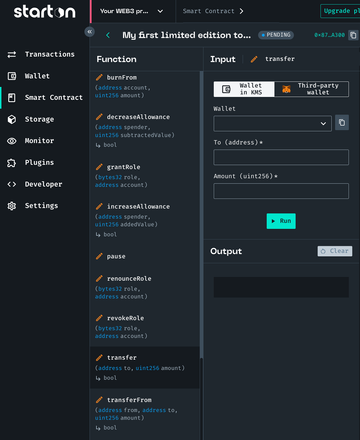
Click Interact.
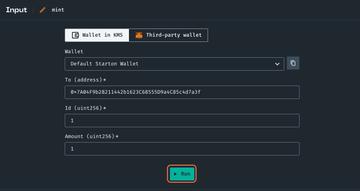
In the function list, select mint.
Select the signer wallet.
Enter the receiving wallet in the field to. Enter the id for your mint. It will be the rank of your NFT
in your collection. And finally, enter an amount.
Click Run.
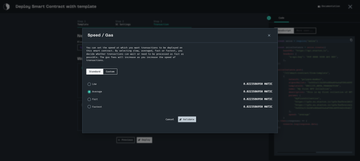
Select your Speed and click Validate.
Congratulations! You've minted the first NFT of your collection.
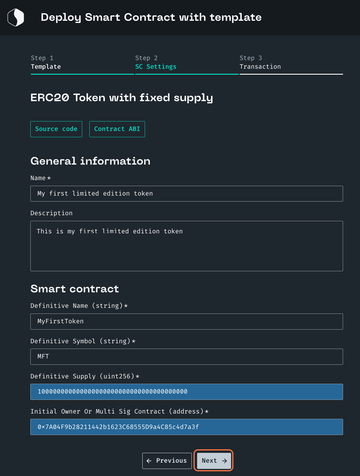
In this tutorial, we will create your own token. The fixed supply version of this standard guarantees no token will ever be created after the initial emission.
Fungible tokens are token from which the value of each token is equal to another.
You will need:
a wallet address with funds: You can use your default Starton wallet, at creation Starton provides you with faucets.
definitiveName: The name of your smart contract which will be reflected on-chain.
definitiveSymbol: The symbol of your smart contract which will be reflected on-chain
definitiveSupply: The total amount of tokens that will ever be minted.
initialOwnerOrMultisigContract: The address that will own the ERC20 contract.
const axios =require("axios") const axiosInstance = axios.create({ baseURL:"https://api.starton.com", headers:{ "x-api-key":"PUT HERE YOUR API KEY", }, }) axiosInstance .post("/v3/smart-contract/from-template",{ network:"",// The blockchain network on which you want to deploy your smart contract signerWallet:"",// The address of the signer wallet templateId:"ERC20_META_TRANSACTION", name:"",// The name of the contract on Starton description:"",// The description of the contract on Starton params:[ "",// The name of your smart contract which will be reflected on-chain. "",// The symbol of your smart contract which will be reflected on-chain "",// The total amount of tokens that will ever be minted. "",// The address that will own the ERC20 contract. ], }) .then((response)=>{ console.log(response.data) })
const axios =require("axios") const axiosInstance = axios.create({ baseURL:"https://api.starton.com", headers:{ "x-api-key":"PUT HERE YOUR API KEY", }, }) axiosInstance .post("/v3/smart-contract/YOUR_SMART_CONTRACT_NETWORK/YOUR_SMART_CONTRACT_ADDRESS/call",{ functionName:"transfer(address,uint256)", params:[ "",// Enter the wallet receiving tokens. "",//amount of token transferred ], signerWallet:"",// Enter the wallet from which tokens will be transferred. speed:"average", }) .then((response)=>{ console.log(response.data) })
In this tutorial, we will create your own token. The mintable supply version of this standard guarantees no token will ever be created after the initial emission.
Fungible tokens are token from which the value of each token is equal to another.
You will need:
a wallet address with funds: You can use your default Starton wallet, at creation Starton provides you with faucets.
definitiveName: The name of your smart contract which will be reflected on-chain.
definitiveSymbol: The symbol of your smart contract which will be reflected on-chain
initialSupply: The initial amount of tokens that will be minted.
initialOwnerOrMultisigContract: The address that will own the ERC20 contract.
const axios =require("axios") const axiosInstance = axios.create({ baseURL:"https://api.starton.com", headers:{ "x-api-key":"PUT HERE YOUR API KEY", }, }) axiosInstance .post("/v3/smart-contract/from-template",{ network:"",// The blockchain network on which you want to deploy your smart contract signerWallet:"",// The address of the signer wallet templateId:"ERC20_MINT_META_TRANSACTION", name:"",// The name of the contract on Starton description:"",// The description of the contract on Starton params:[ "",// The name of your smart contract which will be reflected on-chain. "",// The symbol of your smart contract which will be reflected on-chain "",// The total amount of tokens that will ever be minted. "",// The address that will own the ERC20 contract. ], }) .then((response)=>{ console.log(response.data) })
const axios =require("axios") const axiosInstance = axios.create({ baseURL:"https://api.starton.com", headers:{ "x-api-key":"PUT HERE YOUR API KEY", }, }) axiosInstance .post("/v3/smart-contract/YOUR_SMART_CONTRACT_NETWORK/YOUR_SMART_CONTRACT_ADDRESS/call",{ functionName:"transfer(address,uint256)", params:[ "",// Enter the wallet receiving tokens. "",//amount of token transferred ], signerWallet:"",// Enter the wallet from which tokens will be transferred. speed:"average", }) .then((response)=>{ console.log(response.data) })
In this tutorial, we will see how we can deploy a smart contract and interact with it to mint NFTs on BNB Chain testnet in 6 steps.
We will use random images uploaded on IPFS (a distributed file storage system) and assigned to an BNB Chain address.
You will:
Upload the contract-level metadata
Use a template from Starton for our smart contract (ERC721).
To enter a name on the marketplace’s dashboard and perceive fees when someone sells one of our NFTs, we need to implement the contract-level metadata.
Here are the values we will use:
{
	name: "My Super NFT on BNB",
	description: "You’ve never seen NFTs this beautiful.",
	image: "URI of your image", // This will be used as the image of your collection
	external_link: "",
	seller_fee_basis_points: 100,
	fee_recipient: "PUT YOUR ADDRESS HERE",
}
We now have the content of our metadata, we need to upload it on IPFS.
To upload our files on IPFS we will now use the Starton IPFS pinning service.
As the contract-level metadata only needs to be uploaded once, we can directly do it from our dashboard.
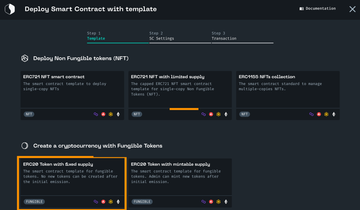
Several standards of smart contracts have been developed for NFTs.
The most used ones are ERC721 and the ERC1155.
If you want to see in more details the differences between the two standards, read The Difference Between ERC721 vs ERC1155.
Today, we will use the ERC721 smart contract template.
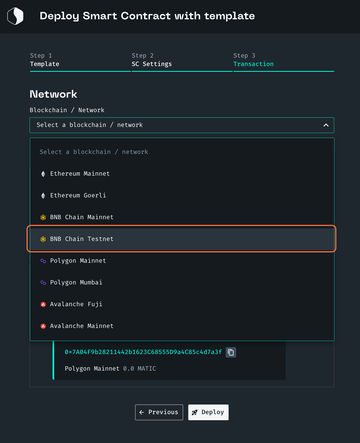
a blockchain / network on which to deploy, here BNB testnet.
the parameters of our contract.
For more information on parameters, check out the Deploying a Smart Contract.
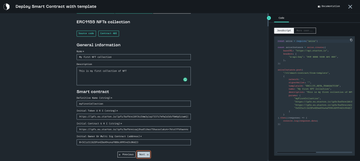
For example, we can call our contract “Best NFTs on BNB” and deploy it on the BNB Testnet network.
The following constructor parameters are:
Name: This name stored on blockchain, we will use “Best NFTs on BNB”.
Symbol: The symbol that will be displayed on blockchain explorers for example. We’ll use “BNFTBNB”.
Base Uri: This corresponds to the root of the url that will be used to find the content. We’ll use “ipfs://ipfs/“ as we store the content on IPFS.
Owner Or Multi Sig Contract: This is the address of the owner of the smart contract. We will put our Starton account address that can be found in the “Wallets” section and should be the one chosen at the top as well.
Contract Uri Suffix: This corresponds to the CID of your contract-level metadata on IPFS. This is needed for example if you want to perceive fees when your NFTs are sold on OpenSea.
We can finally deploy our contract!
With our smart contract deployed, you are redirected on the page where we will interact with our contract.
The process of minting a new NFT and sending it to an address goes in three steps:
We upload the content of our NFT on IPFS (as it is too heavy to be stored on-chain) and get the CID of the content.
We upload a metadata object as a JSON file on IPFS as we do not reference the content directly in the contract. Instead, we put the CID of the content in a metadata object that we upload on IPFS.
We call the function “mint” of our smart contract, giving the CID of our metadata object and the address that will receive the NFT.
You can choose to mint NFT from code or from Starton's interface.
We’ll also use IPFS to store the content that will be referenced in our deployed contract.
We do not store the content directly on blockchain as it is too heavy and would induce a very high cost.
The best solution is to store it somewhere else and only store a reference on-chain.
We can create a simple function like this one:
// The image variable should be a buffer asyncfunctionuploadImageOnIpfs(image, name){ let data =newFormData() data.append("file", image, name) data.append("isSync","true") const ipfsImg =await starton.post("/ipfs/file", data,{ maxBodyLength:"Infinity", headers:{"Content-Type":`multipart/form-data; boundary=${data._boundary}`}, }) return ipfsImg.data }
By calling this function, providing our image as a buffer as a parameter, we should get back an object containing our image’s CID which we will use next in the metadata object.
Consult the metadata standard format on your marketplace's documentation.
We can define a new function using our image’s CID to upload the metadata on IPFS:
We’ll also use IPFS to store the content that will be referenced in our deployed contract.
We do not store the content directly on blockchain as it is too heavy and would induce a very high cost.
The best solution is to store it somewhere else and only store a reference on-chain.
Go to IPFS.
Click Upload.
Select File(s).
Select content.
Enter a name for the file.
Click Upload.
Once our image uploaded, let's upload its metadata so that we can call it from our smart contract function.
We have seen in this tutorial how to upload NFTs on a decentralised file system, how to deploy an ERC721 smart contract using Starton, how to make it compatible with marketplaces standards and how we can dynamically mint the NFTs from code to send them to people!
We hope you liked this tutorial and that you will follow along in this epic journey of making Web3 the new standard for Internet!
We are very eager to see what you can build with NFTs.
Do not hesitate to share what you’ve done!
In this tutorial, we will see how we can deploy a smart contract and interact with it to mint NFTs dynamically from code.
We will use random images uploaded on IPFS (a distributed file storage system) and assigned to an Ethereum address.
You will :
Use a template from Starton for our smart contract (ERC721).
Several standards of smart contracts have been developed for NFTs.
The most used ones are ERC721 and the ERC1155.
The main big difference between the two is that in an ERC721, every NFT is unique which means you will have to reference the content for each of them.
Meanwhile the ERC1155 enables you to create “collections” where there are several copies of the same NFT.
The ERC721, which is easier to use, still can be used to upload several copies of the same content, but is less optimised for this use case than the ERC1155.
If you want to see in more details the differences between the two standards, read The Difference Between ERC721 vs ERC1155.
Today, we will use the ERC721 smart contract template.
We’ll also use IPFS to store the content that will be referenced in our deployed contract.
We do not store the content directly on blockchain as it is too heavy and would induce a very high cost.
The best solution is to store it somewhere else and only store a reference on-chain.
the parameters of our contract.
For more information on parameters, check out the Deploying a Smart Contract.
For example, we can call our contract “My Super NFTs” and deploy it on the Polygon amoy network.
The following constructor parameters are:
Name: This name stored on blockchain, we will keep “My Super NFTs”.
Symbol: The symbol that will be displayed on blockchain explorers for example. We’ll use “MSNFT”.
Base Uri: This corresponds to the root of the url that will be used to find the content. We’ll use “ipfs://ipfs/“ as we store the content on IPFS.
Owner Or Multi Sig Contract: This is the address of the owner of the smart contract. We will put our Starton account address that can be found in the “Wallets” section and should be the one chosen at the top as well.
Contract Uri Suffix: This corresponds to the IPFS cid of your contract level metadata. This is needed for example if you want to perceive fees when your NFTs are sold on OpenSea.
To be able to fill this field we need to upload a JSON file that respects OpenSea’s specification for the contract level metadata on IPFS.
Lost on the Contract Uri Suffix part? Let’s see this in more details so we can finish the deployment of our contract.
This enables us to add a name on the OpenSea’s dashboard and perceive fees when someone sells one of our NFTs.
Here are the values we will use:
{ "name":"My Super NFTs", "description":"You’ve never seen NFTs this beautiful.", "image":"", "external_link":"", "seller_fee_basis_points":100, "fee_recipient":"PUT YOUR ADDRESS HERE" }
We now have the content of our metadata, we need to upload it on IPFS.
On IPFS, the content is not referred using an address like we are used to with urls, but by the content’s value.
Let’s see the difference:
When we query some content based on location we implicitly ask:
"Give me the content that is located at https://… no matter what it is that you find".
Whereas when we query some content based on its value on IPFS we implicitly ask:
"Find the content on the network with the hash XXXXXXX and give it to me, no matter who where it is".
With the location based approach we are specific on the “How” and not on the “What” while with the content based approach it is the opposite.
Using the content based approach, we are sure we get the content we want, without it being altered, replaced or infected as otherwise the hash would have changed as well.
And it is a game changer as we do no longer need to rely on trust!
The hash of the content is called a Content IDentifier (CID) on IPFS.
And when we will upload our contract-level metadata on IPFS we will get a CID back, which is the value we need to put as the Contract Suffix Uri in our smart contract.
To upload our files on IPFS we will now use the Starton IPFS pinning service.
As the contract-level metadata only needs to be uploaded once, we can directly do it from our dashboard
Once done, a column “CID” appears with a value for our file that starts with “Qm”. This is the value we need for the Contract Uri Suffix of our smart contract!
We can finally deploy our contract!
With our smart contract deployed, we are redirected on the page to interact with our contract.
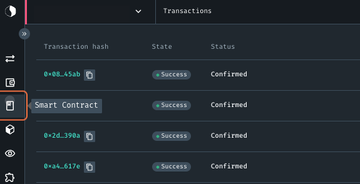
We won’t interact with it from the dashboard but you can click on the smart contract address at the top to see our contract in the blockchain explorer.
You will see next how to upload dynamically our images on IPFS from code with the API.
The process of minting a new NFT and sending it to an address goes in three steps:
We upload the content on IPFS (as it is too heavy to be stored on-chain) and get the CID of the content.
We upload a metadata object as a JSON file on IPFS as we do not reference the content directly in the contract. Instead, we put the CID of the content in a metadata object that we upload on IPFS.
We call the function “mint” of our smart contract, giving the CID of our metadata object and the address that will receive the NFT.
// The image variable should be a buffer asyncfunctionuploadImageOnIpfs(image, name){ let data =newFormData() data.append("file", image, name) data.append("isSync","true") const ipfsImg =await starton.post("/ipfs/file", data,{ maxBodyLength:"Infinity", headers:{"Content-Type":`multipart/form-data; boundary=${data._boundary}`}, }) return ipfsImg.data }
By calling this function, providing our image as a buffer as a parameter, we should get back an object containing our image’s CID which we will use next in the metadata object.
Once all of this is executed, the content should be on IPFS, and associated to the given address in our ERC721 contract.
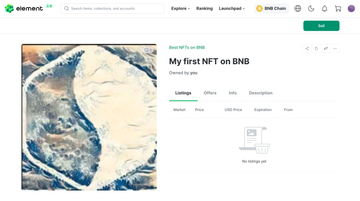
You should be able to see the NFTs on OpenSea or via this link https://testnets.opensea.io/collection/my-super-nfts.
We have seen in this tutorial how to upload NFTs on a decentralised file system, how to deploy an ERC721 smart contract using Starton, how to make it compatible with OpenSea’s standards and how we can dynamicaly mint the NFTs from code to send them to people!
We hope you liked this tutorial and that you will follow along in this epic journey of making Web3 the new standard for Internet!
We are very eager to see what you can build with NFTs.
Do not hesitate to share what you’ve done!
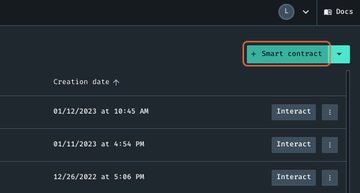
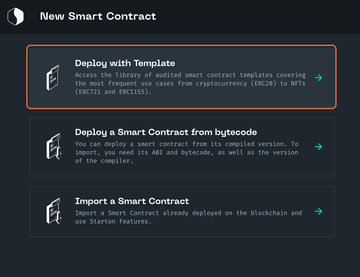
You can also deploy your smart contract from our web application.
In the last tutorial our users registered themselves to our app with an email and a password. Since we want to monitor when they receive an NFT, we need to ask them for their public key at registration.
Create a new SignUp.dto.ts in the src/user directory:
This DTO includes a public address field, which allows users to provide their public EVM address. We will use this address to identify when a user receives a new NFT.
First, we define an axios instance as a member of the StartonService class. This is convenient because we can configure the instance with a baseURL and headers, which prevents us from repeating ourselves in subsequent code.
Next, we define three wrappers for common API calls: transfers, mints, and burns:
We will encapsulate the functions responsible for sending emails in a service that will be exported from the EmailModule.
nest g service email
nest g module email
import{Injectable}from'@nestjs/common'; import{ createTransport }from'nodemailer'; /* |-------------------------------------------------------------------------- | MAILING SERVICE |-------------------------------------------------------------------------- */ @Injectable() exportclassEmailService{ // Utility object to send emails //-------------------------------------------------------------------------- privatereadonly _transporter =createTransport( { host: process.env.EMAIL_HOST,// smtp.elasticemail.com port: process.env.EMAIL_PORT,// default to 2525 with elasticemail auth:{ user: process.env.EMAIL_USER,// The email address that sends the message pass: process.env.EMAIL_PASS,// The password of the email address }, }, { from:`Cryptomancy <${process.env.EMAIL_USER}>`,// "from" field of the message }, ); // Verify SMTP configuration at construction //-------------------------------------------------------------------------- constructor(){ this._transporter.verify().then(()=>{ console.log('Ready to send emails'); }); } // Send an email //-------------------------------------------------------------------------- asyncsendEmail(to:string, subject:string, text:string){ awaitthis._transporter.sendMail({ to, subject, text }); } }
To send emails, we use nodemailer, a package that abstracts SMTP to make it easier to send emails. The first step is to define a transporter, which is responsible for transmitting emails. This can be done by calling the createTransport function and passing a configuration object as an argument to it. For this example we use smtp.elasticemail.com as host. You can create an account and generate SMTP credentials for free on their website.
In the constructor, we call the verify method to check if we are authenticated correctly and that the server is ready to accept messages.
We also define a single method, sendEmail, which takes a recipient email address, subject, and message body as parameters and send the email.
Now that we have all the necessary utility services, we need services for adding and updating items in the database.
Run the following command to generate the ItemService under src/item/item.service.ts:
nest g service item
Update it to look like this:
/* | Developed by Starton | Filename : item.service.ts | Author : Alexandre Schaffner ([email protected]) */ import{Injectable}from'@nestjs/common'; import{Prisma}from'@prisma/client'; import{PrismaService}from'src/prisma/prisma.service'; import{ nullAddress }from'src/utils/constants'; /* |-------------------------------------------------------------------------- | ITEM SERVICE |-------------------------------------------------------------------------- */ @Injectable() exportclassItemService{ constructor(privatereadonly prisma:PrismaService){} asynccreate(data:Prisma.ItemCreateInput){ awaitthis.prisma.item.create({ data }); } asyncupdateByTokenId(tokenId:string, data:Prisma.ItemUpdateInput){ awaitthis.prisma.item.update({ where:{ tokenId }, data }); } asyncdeleteByTokenId(tokenId:string){ awaitthis.prisma.item.delete({ where:{ tokenId }}); } asyncsafeTransferFrom( collection:string, tokenId:string, from:string, to:string, ){ // Add item to database in case of a mint (from === nullAddress) //-------------------------------------------------------------------------- if(from === nullAddress){ awaitthis.prisma.item.create({ data:{ collection:{ connect:{ contractAddress: collection, }, }, tokenId, ownerAddress: to, }, }); // Increment nextTokenId in the database //-------------------------------------------------------------------------- awaitthis.prisma.collection.update({ where:{ contractAddress: collection, }, data:{ nextTokenId:{ increment:1, }, }, }); // Update item's owner in case of a transfer //-------------------------------------------------------------------------- }else{ awaitthis.prisma.item.updateMany({ where:{ AND:[ { tokenId }, { collection:{ contractAddress: collection }}, { ownerAddress: from }, ], }, data:{ ownerAddress: to, }, }); } } }
The ItemService is responsible for managing items in the database. It provides several methods:
create(data: Prisma.ItemCreateInput): adds a new item to the database.
updateByTokenId(tokenId: string, data: Prisma.ItemUpdateInput): updates an existing item in the database based on its token ID.
deleteByTokenId(tokenId: string): removes an item from the database based on its token ID.
safeTransferFrom(collection: string, tokenId: string, from: string, to: string): adds or updates an item in the database depending on whether it was transferred or minted. If the from address is nullAddress, it creates a new item in the database (mint). Otherwise, it updates the item's owner in the database.
/* | Developed by Starton | Filename : transfer.service.ts | Author : Alexandre Schaffner ([email protected]) */ import{Injectable}from'@nestjs/common'; import{Prisma}from'@prisma/client'; import{PrismaService}from'src/prisma/prisma.service'; /* |-------------------------------------------------------------------------- | TRANSFER SERVICE |-------------------------------------------------------------------------- */ @Injectable() exportclassTransferService{ constructor(privatereadonly prisma:PrismaService){} // Create a transfer record in the database //-------------------------------------------------------------------------- asynccreate(transfer:Prisma.TransferCreateInput){ awaitthis.prisma.transfer.create({ data: transfer }); } }
The create method adds a new record to the Transfer collection of the database. We will call this method every time a transfer happens.
For our app to be notified of a Transfer event, we need to set up a Watcher on Starton. A Watcher is a condition that is checked upon inspection of each block. When the watcher is triggered, it sends a POST request to a webhook containing data about the event. You can find how to create a Watcher here.
/* | Developed by Starton | Filename : transfer.controller.ts | Author : Alexandre Schaffner ([email protected]) */ import{ Body, Controller, InternalServerErrorException, Post, UseGuards, }from'@nestjs/common'; import{Prisma}from'@prisma/client'; import{MintDto}from'src/contracts/dto/Mint.dto'; import{SafeTransferDto}from'src/contracts/dto/SafeTransfer.dto'; import{AuthGuard}from'src/guards/auth/auth.guard'; import{ItemService}from'src/item/item.service'; import{StartonService}from'src/starton/starton.service'; import{UserService}from'src/user/user.service'; import{ cryptoquartzCollectionAddress }from'src/utils/constants'; import{EmailService}from'../email/email.service'; import{TransferService}from'./transfer.service'; import{StartonGuard}from'src/guards/starton/starton.guard'; /* |-------------------------------------------------------------------------- | TRANSFER CONTROLLER |-------------------------------------------------------------------------- */ @Controller('transfer') exportclassTransferController{ constructor( privatereadonly transferService:TransferService, privatereadonly starton:StartonService, privatereadonly userService:UserService, privatereadonly itemService:ItemService, privatereadonly emailService:EmailService, ){} /* |-------------------------------------------------------------------------- | WEBHOOK ENDPOINT TRIGGERED BY STARTON |-------------------------------------------------------------------------- */ @UseGuards(StartonGuard) @Post('webhook') asyncwebhook(@Body() body:any){ try{ const{ from, to, id }= body.data.transferSingle; const transfer:Prisma.TransferCreateInput={ item:{ connect:{ tokenId: id.hex.toLowerCase()}}, from: from.toLowerCase(), to: to.toLowerCase(), toUser:{ connect:{ publicAddress: to.toLowerCase()}}, fromUser:{ connect:{ publicAddress: from.toLowerCase()}}, txHash: body.data.transaction.hash.toLowerCase(), }; // Check if user exists, if not, don't connect records //-------------------------------------------------------------------------- const toUser =awaitthis.userService.findByPublicAddress( to.toLowerCase(), ); if(!toUser)delete transfer.toUser; const fromUser =awaitthis.userService.findByPublicAddress( from.toLowerCase(), ); if(!fromUser)delete transfer.fromUser; // Change the owner of the item in the database //-------------------------------------------------------------------------- awaitthis.itemService.safeTransferFrom( cryptoquartzCollectionAddress, id.hex.toLowerCase(), from.toLowerCase(), to.toLowerCase(), ); // Create the transfer record //-------------------------------------------------------------------------- awaitthis.transferService.create(transfer); // If the recipient is a user, send an email //-------------------------------------------------------------------------- if(!toUser)return; // Use a template here //-------------------------------------------------------------------------- awaitthis.emailService.sendEmail( toUser.email, 'NFT Transfer', 'The address '+ from + ' sent the NFT #'+ id.hex+ ' to your address '+ to + '.', ); return; }catch(err:unknown){ console.error(err); thrownewInternalServerErrorException(); } } }
So, we need a route to handle requests sent by Starton.
We create a /transfer/webhook endpoint. In it, we create a Transfer record from the data we received in the body and check if addresses in the Transfer record are related to a user.
Then, we call itemService's safeTransferFrom method to update the Item’s owner in the database and we create a new Transfer record in the DB via transferService's create method.
Finally, we use the emailService we coded previously to send an email to the receiver of the NFT if he is a registered user.
Note that the endpoint is protected by the StartonGuard, which we will focus later on.
We can now be notified of transfers via the /transfer/webhook endpoint. This is good, but we need to secure the endpoint so that only Starton can trigger it.
To do so we create a StartonGuard:
nest g guard guards/starton
/* | Developed by Starton | Filename : starton.guard.ts | Author : Alexandre Schaffner ([email protected]) */ import{CanActivate,ExecutionContext,Injectable}from'@nestjs/common'; import{ createHmac }from'crypto'; import{Request}from'express'; /* |-------------------------------------------------------------------------- | STARTON'S SIGNATURE VERIFICATION GUARD |-------------------------------------------------------------------------- */ @Injectable() exportclassStartonGuardimplementsCanActivate{ canActivate(context:ExecutionContext):boolean{ const request:Request= context.switchToHttp().getRequest(); const payload =JSON.stringify(request.body); const reqSignature = request.get('starton-signature'); if(!reqSignature)returnfalse; // Re-compute the signature and compare it with the one received //-------------------------------------------------------------------------- const localSignature =createHmac( 'sha256', process.env.STARTON_SECRETasstring, ) .update(Buffer.from(payload)) .digest('hex'); return reqSignature === localSignature; } }
In it, we retrieve the Request object, the payload of the body and the signature. Then, we compute the signature again using the payload and the signing key (you can find yours in your Starton’s dashboard under: Your project > Developer > Webhook). Finally we compare the signature we computed with the one provided in the header of the request we retrieved previously. If they match, we allow access to the endpoint, and if not it responds with an error.
Next, we add endpoints to allow minting, burning and transfers of items.
/* |-------------------------------------------------------------------------- | TRANSFER / MINT / BURN ENDPOINTS |-------------------------------------------------------------------------- */ // safeTransferFrom //-------------------------------------------------------------------------- @UseGuards(AuthGuard) @Post() asyncsafeTransferFrom(@Body() safeTransferDto:SafeTransferDto){ awaitthis.starton.initTransfer( safeTransferDto.from, safeTransferDto.to, safeTransferDto.tokenId, ); } // Mint a token //-------------------------------------------------------------------------- @UseGuards(AuthGuard) @Post('mint') asyncmint(@Body() mintDto:MintDto){ awaitthis.starton.initMint(mintDto.to, mintDto.tokenId); } // Burn a token //-------------------------------------------------------------------------- @UseGuards(AuthGuard) @Post('burn') asyncburn(@Body() burnDto:MintDto){ awaitthis.starton.initBurn(burnDto.to, burnDto.tokenId); awaitthis.itemService.deleteByTokenId(burnDto.tokenId); }
All the 3 endpoints calls methods of the Starton wrapper service. Thus, Starton can make the smart contract function calls to apply changes on-chain. Every call to this endpoint ends up in a Transfer event on-chain, which triggers our webhook and applies changes to the database.
You successfully created an email notification system that is triggered every time a transfer occurs on your ERC1155 NFTs collection !
You have learned how to create an email module to automatically send emails with Nodemailer, how you can use a Watcher with a webhook to track for specific event on the blockchain.
Now that you have successfully created an email notification system that sends emails whenever a transfer occurs on your ERC1155 NFTs collection, you can customize the email template to make it more appealing to your users. You can also explore other notification methods such as SMS or push notifications to provide your users with more options. Additionally, you may want to consider implementing more security features like roles to ensure that your endpoints are properly secured against unauthorized access.
To upload your metadata, it must be in the Json format. You need to follow the standard of the marketplace where you want to showcase your NFT.
For example, if you wish to showcase your NFT on OpenSea, you can use this template:
{
"name":"My Super NFTs",
"description":"You’ve never seen NFTs this beautiful.",
"image":"",
"external_link":"",
"seller_fee_basis_points":100,
"fee_recipient":""
}
You can upload your file on IPFS using Starton from Dashboard or from Code.
From Code
From Webapp
const axios =require("axios"); constFormData=require("form-data"); const fs =require("fs"); // AUTHENTICATING TO THE API USING YOUR API KEY const startonApi = axios.create({ baseURL:"https://api.starton.com", headers:{ "x-api-key":"YOUR_API_KEY", }, }); // UPLOAD JSON TO IPFS. constuploadJsonToIpfs=async(json, name)=>{ const ipfsJson =await startonApi.post("/v3/ipfs/json",{ name: name of your json, content: json, metadata:{your:"additionnal",meta:"data"}, }); return ipfsJson; }; // ENTERING YOUR JSON'S INFORMATION uploadJsonToIpfs({"metadata":"data"},"Json name") .then((res)=>console.log(res)) .catch((e)=>console.log(e));
Go to Storage.
Click Upload.
Select JSON.
Select content.
Enter a name for the file.
Click Upload.
After uploading your file, you will get a URI (the address of your file on IPFS), and a CID (content Identifier), that you can use you deploy your ERC721 or ERC1155 smart contracts.
When creating and selling a collection, you can allow only a few chosen people to buy them for a defined price. This system is called a whitelist sale and it is what we are going to see today.
You will need
nodejs (version 16 or over)
npm
ethers v5
merkletreejs
a deployed ERC721 NFT contract
note
To deploy a Sale contract, you must have deployed your NFT by deploying an ERC721 contract first. Learn how to Deploy your NFT with Starton
To deploy this contract, you need to compute a special parameter called definitiveMerkleRoot.
Step 1
Creating a merkle root from all approved addresses
The best way to create a whitelist in solidity is by generating a merkle tree.
It is a data structure that can store many data in a limited space which ends up being a merkle root.
To be able to generate this parameter, you will need to use this code snippet:
import{ ethers }from"ethers" import{MerkleTree}from"merkletreejs" // Compute the root of the merkletree const addresses =[ /* The addresses of the wallets allowed to mint */ ] const leaves = addresses.map((addr)=> ethers.keccak256(addr)) const merkleTree =newMerkleTree(leaves, ethers.keccak256,{sortPairs:true}) const rootHash = merkleTree.getRoot()
caution
Don’t forget to replace addresses with the actual wallet addresses of the whitelisted accounts.
For the whitelist sale contract to be able to mint new tokens, you are going to need to grant the newly created contract the MINTER_ROLE over the base contract deployed.
Now that the contract is deployed, every user can mint a token.
To be able to do this, every user will need to specify two parameters while minting:
the address of the receiver of the NFT
the merkle proof
This proof is also linked to the merkle tree and it can prove that an address is inside the merkle tree To be able to generate it, you can use this code snippet:
import{ keccak256 }from"ethers/lib/utils" import{MerkleTree}from"merkletreejs" // Compute the root of the merkletree const addresses =[ /* The addresses of the wallets allowed to mint */ ] const leaves = addresses.map((addr)=>keccak256(addr)) merkleTree =newMerkleTree(leaves, keccak256,{sortPairs:true}) // replace MINTER_ADDRESS with the address of the account that will mint the NFT const proof = merkleTree.getHexProof(keccak256(MINTER_ADDRESS))
Users will then be able to mint a new token using their wallet such as metamask with the right parameters.
Congrats! You're now all set for your NFT Sale. You can connect this smart contract using the mint function to a button. By, using etherjs/web3js, call the mint function of the sale contract with the desired address.
You can also give more information on this mint page such as NFT left to mints or end time of the sale.