Starton Library already offers anyone a library of ready-to-use audited smart contract templates. But what if you want to use your own custom template?
Well, you can import it on Starton Connect from its bytecode as we will see in this tutorial.
Prerequisite: You should have your custom smart contract as a .sol file ready.
The bytecode of a smart contract is the compiled version of your smart contract.
As we use human language code (the .sol file) to understand each other and have a good time developing, the machine needs a version in its own language to work properly.
And this is exactly what the bytecode is. It is the human readable contract transformed into a machine readable format.
Now that we know what it is, let’s get the bytecode of our smart contract !
To do this, we’ll use Remix which is a development environment (IDE) that lives in a browser.
You should see something like this the first time you come:
We can see in the File Explorers on the left that a few .sol example files already exist under the contracts folder.
We won’t use them so you can delete them if you want or keep them here.
We can now:
Select the contracts folder
Click on the upload like button just above, which will open a popup
Select our .sol file to import it in Remix
For the sake of this tutorial, we will use the StartonERC20BurnPause.sol that can be found here (all our templates are open source !).
Then we will right click on our newly imported contract, and select Compile in order to generate the bytecode we will use.
You should see a green mark on the second icon of the left panel.
This is the compilation tab. Let’s click on it.
We are now in the Solidity Compiler tab and if we scroll all the way down we should see on the bottom right Bytecode and ABI (we will also use that later).
We can copy to clipboard the ABI by clicking on it, but the bytecode is not under the right format ... So we need to click on Compilation Details just above.
It will open a popup with a lot of sections. To get the bytecode we have to expand the Bytecode section and scroll all the way down to find the object field value.
This is the value we are interested in !
Now that we have the bytecode and ABI, we will call Starton Connect’s API to deploy our contract.
First, be sure to have an API key already created and available. You can look here if it is not yet the case.
We will now use the from-bytecode endpoint to deploy our contract. We will need the abi and the bytecode we found in step 1) and deploy our contract on the Ropsten network of Ethereum.
The complete list of available networks can be found in Relayer.
const axios =require("axios") const http = axios.create({ baseURL:"https://api.starton.com/v3", headers:{ "x-api-key":"YOUR_API_KEY", }, }) http.post("/smart-contract/from-bytecode",{ network:"ethereum-ropsten", name:"My contract's name", description:"This is the most beautiful ERC20 ever deployed.", params:[ // parameter values for the smart contract constructors, this will change depending of your contract "My token", "TOKEN", "1000000000000000000000", "0x0",// This is the owner and should not be set to 0x0 adress but we do this as this is a tutorial. You should use either the KMS adress or one that you control. ], abi:"",// Paste here the abi you copied to clipboard bytecode:"",// Paste here the bytecode you copied to clipboard compilerVersion:"string", signerWallet:"string", }).then((response)=>{ console.log(response.data) })
And it should be done! You should receive back an object with the smart contract details such as the hash and the address of it.
You can then use the address or the transactionHash to check it on the blockchain explorer of your selected network!
Use Starton Connect to deploy our smart contract
If you want to see how you can now interact with your smart contract, you can check our tutorial on How to Interact with a contract from code!
We hope you like this tutorial, and if by any mean you struggle on any step you can find some help on our Discord!
In this tutorial, we will see how we can deploy a smart contract and interact with it to mint NFTs on BNB Chain testnet in 6 steps.
We will use random images uploaded on IPFS (a distributed file storage system) and assigned to an BNB Chain address.
You will:
Upload the contract-level metadata
Use a template from Starton for our smart contract (ERC721).
To enter a name on the marketplace’s dashboard and perceive fees when someone sells one of our NFTs, we need to implement the contract-level metadata.
Here are the values we will use:
{
	name: "My Super NFT on BNB",
	description: "You’ve never seen NFTs this beautiful.",
	image: "URI of your image", // This will be used as the image of your collection
	external_link: "",
	seller_fee_basis_points: 100,
	fee_recipient: "PUT YOUR ADDRESS HERE",
}
We now have the content of our metadata, we need to upload it on IPFS.
To upload our files on IPFS we will now use the Starton IPFS pinning service.
As the contract-level metadata only needs to be uploaded once, we can directly do it from our dashboard.
Several standards of smart contracts have been developed for NFTs.
The most used ones are ERC721 and the ERC1155.
If you want to see in more details the differences between the two standards, read The Difference Between ERC721 vs ERC1155.
Today, we will use the ERC721 smart contract template.
a blockchain / network on which to deploy, here BNB testnet.
the parameters of our contract.
For more information on parameters, check out the Deploying a Smart Contract.
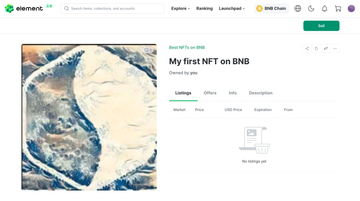
For example, we can call our contract “Best NFTs on BNB” and deploy it on the BNB Testnet network.
The following constructor parameters are:
Name: This name stored on blockchain, we will use “Best NFTs on BNB”.
Symbol: The symbol that will be displayed on blockchain explorers for example. We’ll use “BNFTBNB”.
Base Uri: This corresponds to the root of the url that will be used to find the content. We’ll use “ipfs://ipfs/“ as we store the content on IPFS.
Owner Or Multi Sig Contract: This is the address of the owner of the smart contract. We will put our Starton account address that can be found in the “Wallets” section and should be the one chosen at the top as well.
Contract Uri Suffix: This corresponds to the CID of your contract-level metadata on IPFS. This is needed for example if you want to perceive fees when your NFTs are sold on OpenSea.
We can finally deploy our contract!
With our smart contract deployed, you are redirected on the page where we will interact with our contract.
The process of minting a new NFT and sending it to an address goes in three steps:
We upload the content of our NFT on IPFS (as it is too heavy to be stored on-chain) and get the CID of the content.
We upload a metadata object as a JSON file on IPFS as we do not reference the content directly in the contract. Instead, we put the CID of the content in a metadata object that we upload on IPFS.
We call the function “mint” of our smart contract, giving the CID of our metadata object and the address that will receive the NFT.
You can choose to mint NFT from code or from Starton's interface.
We’ll also use IPFS to store the content that will be referenced in our deployed contract.
We do not store the content directly on blockchain as it is too heavy and would induce a very high cost.
The best solution is to store it somewhere else and only store a reference on-chain.
We can create a simple function like this one:
// The image variable should be a buffer asyncfunctionuploadImageOnIpfs(image, name){ let data =newFormData() data.append("file", image, name) data.append("isSync","true") const ipfsImg =await starton.post("/ipfs/file", data,{ maxBodyLength:"Infinity", headers:{"Content-Type":`multipart/form-data; boundary=${data._boundary}`}, }) return ipfsImg.data }
By calling this function, providing our image as a buffer as a parameter, we should get back an object containing our image’s CID which we will use next in the metadata object.
Consult the metadata standard format on your marketplace's documentation.
We can define a new function using our image’s CID to upload the metadata on IPFS:
We’ll also use IPFS to store the content that will be referenced in our deployed contract.
We do not store the content directly on blockchain as it is too heavy and would induce a very high cost.
The best solution is to store it somewhere else and only store a reference on-chain.
Go to IPFS.
Click Upload.
Select File(s).
Select content.
Enter a name for the file.
Click Upload.
Once our image uploaded, let's upload its metadata so that we can call it from our smart contract function.
We have seen in this tutorial how to upload NFTs on a decentralised file system, how to deploy an ERC721 smart contract using Starton, how to make it compatible with marketplaces standards and how we can dynamically mint the NFTs from code to send them to people!
We hope you liked this tutorial and that you will follow along in this epic journey of making Web3 the new standard for Internet!
We are very eager to see what you can build with NFTs.
Do not hesitate to share what you’ve done!
In this tutorial, we will see how we can deploy a smart contract and interact with it to mint NFTs dynamically from code.
We will use random images uploaded on IPFS (a distributed file storage system) and assigned to an Ethereum address.
You will :
Use a template from Starton for our smart contract (ERC721).
Several standards of smart contracts have been developed for NFTs.
The most used ones are ERC721 and the ERC1155.
The main big difference between the two is that in an ERC721, every NFT is unique which means you will have to reference the content for each of them.
Meanwhile the ERC1155 enables you to create “collections” where there are several copies of the same NFT.
The ERC721, which is easier to use, still can be used to upload several copies of the same content, but is less optimised for this use case than the ERC1155.
If you want to see in more details the differences between the two standards, read The Difference Between ERC721 vs ERC1155.
Today, we will use the ERC721 smart contract template.
We’ll also use IPFS to store the content that will be referenced in our deployed contract.
We do not store the content directly on blockchain as it is too heavy and would induce a very high cost.
The best solution is to store it somewhere else and only store a reference on-chain.
the parameters of our contract.
For more information on parameters, check out the Deploying a Smart Contract.
For example, we can call our contract “My Super NFTs” and deploy it on the Polygon amoy network.
The following constructor parameters are:
Name: This name stored on blockchain, we will keep “My Super NFTs”.
Symbol: The symbol that will be displayed on blockchain explorers for example. We’ll use “MSNFT”.
Base Uri: This corresponds to the root of the url that will be used to find the content. We’ll use “ipfs://ipfs/“ as we store the content on IPFS.
Owner Or Multi Sig Contract: This is the address of the owner of the smart contract. We will put our Starton account address that can be found in the “Wallets” section and should be the one chosen at the top as well.
Contract Uri Suffix: This corresponds to the IPFS cid of your contract level metadata. This is needed for example if you want to perceive fees when your NFTs are sold on OpenSea.
To be able to fill this field we need to upload a JSON file that respects OpenSea’s specification for the contract level metadata on IPFS.
Lost on the Contract Uri Suffix part? Let’s see this in more details so we can finish the deployment of our contract.
This enables us to add a name on the OpenSea’s dashboard and perceive fees when someone sells one of our NFTs.
Here are the values we will use:
{ "name":"My Super NFTs", "description":"You’ve never seen NFTs this beautiful.", "image":"", "external_link":"", "seller_fee_basis_points":100, "fee_recipient":"PUT YOUR ADDRESS HERE" }
We now have the content of our metadata, we need to upload it on IPFS.
On IPFS, the content is not referred using an address like we are used to with urls, but by the content’s value.
Let’s see the difference:
When we query some content based on location we implicitly ask:
"Give me the content that is located at https://… no matter what it is that you find".
Whereas when we query some content based on its value on IPFS we implicitly ask:
"Find the content on the network with the hash XXXXXXX and give it to me, no matter who where it is".
With the location based approach we are specific on the “How” and not on the “What” while with the content based approach it is the opposite.
Using the content based approach, we are sure we get the content we want, without it being altered, replaced or infected as otherwise the hash would have changed as well.
And it is a game changer as we do no longer need to rely on trust!
The hash of the content is called a Content IDentifier (CID) on IPFS.
And when we will upload our contract-level metadata on IPFS we will get a CID back, which is the value we need to put as the Contract Suffix Uri in our smart contract.
To upload our files on IPFS we will now use the Starton IPFS pinning service.
As the contract-level metadata only needs to be uploaded once, we can directly do it from our dashboard
Once done, a column “CID” appears with a value for our file that starts with “Qm”. This is the value we need for the Contract Uri Suffix of our smart contract!
We can finally deploy our contract!
With our smart contract deployed, we are redirected on the page to interact with our contract.
We won’t interact with it from the dashboard but you can click on the smart contract address at the top to see our contract in the blockchain explorer.
You will see next how to upload dynamically our images on IPFS from code with the API.
The process of minting a new NFT and sending it to an address goes in three steps:
We upload the content on IPFS (as it is too heavy to be stored on-chain) and get the CID of the content.
We upload a metadata object as a JSON file on IPFS as we do not reference the content directly in the contract. Instead, we put the CID of the content in a metadata object that we upload on IPFS.
We call the function “mint” of our smart contract, giving the CID of our metadata object and the address that will receive the NFT.
// The image variable should be a buffer asyncfunctionuploadImageOnIpfs(image, name){ let data =newFormData() data.append("file", image, name) data.append("isSync","true") const ipfsImg =await starton.post("/ipfs/file", data,{ maxBodyLength:"Infinity", headers:{"Content-Type":`multipart/form-data; boundary=${data._boundary}`}, }) return ipfsImg.data }
By calling this function, providing our image as a buffer as a parameter, we should get back an object containing our image’s CID which we will use next in the metadata object.
Once all of this is executed, the content should be on IPFS, and associated to the given address in our ERC721 contract.
You should be able to see the NFTs on OpenSea or via this link https://testnets.opensea.io/collection/my-super-nfts.
We have seen in this tutorial how to upload NFTs on a decentralised file system, how to deploy an ERC721 smart contract using Starton, how to make it compatible with OpenSea’s standards and how we can dynamicaly mint the NFTs from code to send them to people!
We hope you liked this tutorial and that you will follow along in this epic journey of making Web3 the new standard for Internet!
We are very eager to see what you can build with NFTs.
Do not hesitate to share what you’ve done!
You can also deploy your smart contract from our web application.